Wednesday, December 30, 2009
Happy New Year!
Waffles
Ingredients:
2 cups all-purpose flour
2 teaspoons baking powder
1 teaspoon baking soda
1 teaspoon salt
4 Tablespoons sugar
3 eggs
2 Tablespoons butter, melted
1-1/2 cups buttermilk
2 cups strawberries
½ cups pecans
whipped cream (preferably fresh)
Preparation:
Preheat waffle iron. In a medium-sized bowl, whisk all dry ingredients together. In another bowl combine butter, eggs and buttermilk. Add wet ingredients to dry and stir until combined. Do not over mix. Let rest for 15 minutes. Following manufacturers recommendation, ladle the batter onto the waffle iron. Close lid and cook until brown on both sides.
Serve hot with whipped cream and strawberries and pecans. Makes 6 (8 inch) waffles.
Saturday, December 12, 2009
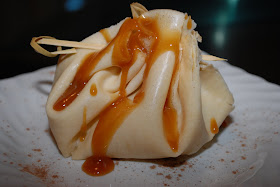
Aumônière Tatin
Ingredients
Caramel Sauce:
Beat the eggs, water, and milk in a bowl. Beat in the flour, then the butter, until the mixture is smooth. (Or place the eggs, water, milk, and flour in a blender and mix until smooth. Add the melted butter.) Refrigerate the batter until you're ready to make the crepes. Makes 14 10” crepes.
Combine the butter and sugar in a sauté pan over medium heat. Add the cider. Peel, core and dice the apples. Cook until the sauce has thickened but the apples still hold their shape. Add cinnamon or nutmeg and set aside.
Combine the sugar and water in a heavy saucepan over medium heat. Dissolve the sugar, then heat on high and cook until the mixture begins to turn golden. Remove from heat and beat in the cream with a wire whisk.
Warm up the apple filling and caramel sauce.
Heat a crepe pan and add a tablespoon of butter. Swirl the butter around the pan, then pour off excess. Add 1 to 2 tablespoons of batter to the pan, swirling it around to coat the pan evenly. A 10" Lodge Cast Iron Round Griddle is perfect for this application! As soon as the edges of the crepe turn brown, flip it to brown the other side, about 1 minute (if the crepes seem too thick, stir a little more milk into the batter).Remove the crepe, fill with the apple mixture, roll it and top with the caramel sauce.
Sunday, November 22, 2009
Tourte de Blette (Swiss Chard Pie)
Blette (Swiss chard) probably wins the prize as the most popular Niçois vegetable, because it can be grown year-round in the area’s arid climate. In local bakeries you’ll come across two types of tourte de blettes, the savory one and a sweet version made with raisins, pine nuts and a little rum and topped with icing sugar. If the puff pastry used here is too rich for you, you can use the pissaladière dough instead, dividing into two and rolling it very thin. I usually don’t bother to make my own puff pastry, but I am careful to choose a brand made entirely with butter and free of additives.
Tourte de Blettes
(Contributed by Rosa Jackson)
Ingredients:
1 lb Swiss chard leaves
4 oz short-grain rice, such as arborio
1 onion
4 oz bacon
1 tbsp olive oil
3 eggs
2 oz Parmesan cheese
Sea salt and freshly ground pepper
2 sheets ready-made puff pastry
Preparation:
Bring a medium pot of water to the boil and cook the rice for about 20 mins. Drain and set aside.
Bring a large pot of water to the boil, add a small handful of coarse salt and blanch the chard leaves for about 5 mins. Rinse the leaves in cold water, squeeze dry and chop finely.
Chop the onion finely and cut the bacon into small dice. In a large frying pan, heat the olive oil and sauté the onion and bacon over medium heat until the bacon starts to brown lightly. Add the chard and sauté for about 5 mins. Transfer this mixture to a large bowl and add 2 of the eggs, the grated Parmesan, salt and pepper.
Place the pastry on a large baking sheet and spread out the filling to within 1/2 inch of the edges. Top with the second sheet of pastry and press the edges together. Beat the remaining egg and brush the pastry with the egg. Bake for 35 to 40 mins at 400 F.
Variation: Another popular tart in Nice is filled with zucchini (courgettes). Just replace the chard with finely diced zucchini and proceed exactly the same way. Alternatively, make the same recipe using finely diced pumpkin or squash instead of zucchini. Serves 6
Saturday, November 7, 2009
Notes From Nice...
Originally a Greek colony, Nice was under Italian rule until 1860, when through majority vote, it became part of France. There is no mistaking the Italian influence, from its' architecture and language to the ingredients and preparation of its' food. And if street food is any indication of the soul of a city, then that, too, is a unique experience here in this city by the Meditteranean Sea. From socca (chickpea pancake) to pissaladiere (carmelized onion tart) to tourte de blettes (swiss chard, bacon and rice pie), you can't help being intriqued by the simplicity, yet incredible taste of theses foods.
While walking through the markets one gets a clearer sense of the ingredients that are so uniquely Nicois and ever-present in the cuisine - olives and olive oils, eggplant, mushrooms, all things citrus, herbs. salts, spices, confitures (homemade jams), regional fruits and vegetables, etc, etc etc. I was like a child in a candy store - I wanted to buy some of everything. Believe it or not, of all the exciting sights, smells and tastes, my "aha moment" was the discovery of blue potatoes (I don't know how this one got past me). Can't you just imagine some blue mashed potatoes with your upcoming Thanksgiving dinner? No, I have not gone off the edge' but after my tour, I'm close! Suffice it to say that come spring, I will be looking for a lot of new exotic veggies to plant in my garden.
So, enjoy the photos; and look forward to several Nicois recipes over the next few weeks.
Fountain guarding the entrance to the "Old City of Nice"
Chef Rosa Jackson
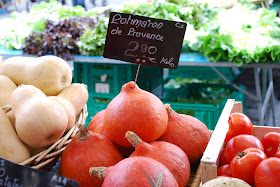
Local variety of pumpkin
Nicois oranges, lemons and clementimes
Designation for "organic agriculture"
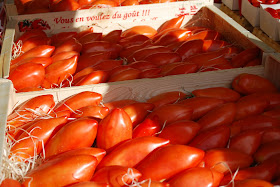
Heirloom tomatoes
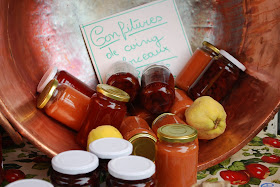
Homemade confitures (jams)
Mountain mushrooms
Cannolis and local pastries
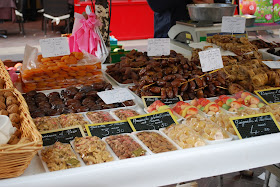
Candy made with quince fruit and nuts
Dates, dates and more dates
Quince - a pear-like fruit
Tomatoes - a much larger "roma" variety
Various olive oils
Nicois olives
Vanilla beans
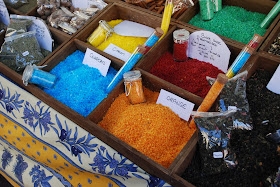
Flavored sugars
Herbs
Salts
Spices
Tuesday, October 27, 2009
How to Make Homemade Applesauce
It is that time of year again, apple season! The leaves are falling, the foliage is changing to the most beautiful fall colors and the weather is cooler. So, what better time to can applesauce for the winter. Prices for apples at your local farms are cheaper than at the grocery store. They are fresher and have not been coated with a shiny wax.
North Carolina happens to have some of the best apple orchards. I visited Deal Apple Orchards in Taylorsville, NC. It is off the beaten path, but well worth the peaceful country drive. The staff was very friendly and helpful. If you haven’t visited a local apple grower I highly recommend going now. The season is almost over.
Equipment and Ingredients:
Apples (approx. 50 small to medium)
Cinnamon
Jar grabber
Tongs or lid lifter
Jar funnel
2 large pot 8-10 quarts each
Large spoon
Ball jars with lids and rings
1 Water Bath Canner
KitchenAid stand mixer with the vegetable and fruit strainer (Sieve or Foley Food Mill will work but more labor intensive. You will also need the Food Grinder tray.
The first step is to wash the apples in cold water. Then core apples and put everything even the core in the large pot. The pot should have 1 inch of water in it.
Place the pot on the stove on high. Once it starts to boil turn it to medium. Let the apples cook until they all cook through. I cooked my apples longer than necessary but it made a smooth applesauce verses chunky.
While apples are cooking wash and boil glass jars and lids. This will sterilize the jars and lids. You can also use the dishwasher if it has a sterilization cycle.
attachment.
I highly recommend purchasing the KitchenAid attachments if you have the mixer. If you will be baking and canning often it is well worth the price. If you do not have the mixer the investment is priceless and the mixer will last a lifetime.
If you have not placed your mixer on the side of the kitchen sink that has the garbage disposal
place a container in the sink to catch all of the waste.
Place the applesauce in a large pot and place on low heat to keep it hot. If you are using the apples to bake with do not add sugar. It will be difficult to know how much sugar to use later. I did add approximately 2 tablespoons of cinnamon to the 8.5 quarts of applesauce. If you are making it to eat you can add sugar and more cinnamon to taste. Put applesauce in the hot sterilized jars with the funnel. Fill jar, but leave a ¼ inch space at top. Make sure the lip of the jar is clean before placing the lid on the jar.
After the lids are on the jars, (I could only fit 7 in my canning pot.), place jars in water bath. If you are above sea level (up to 1000 feet) boil pint jars for 15 minutes and quart jars for 20 minutes covered. If you are above 1000 feet follow the recommended process times. To see recommended increase(s) in process time for applesauce in a boiling-water canner, click here.
Keep remaining applesauce on low heat while the first jars are boiling. Once it has boiled for the correct timeframe take the jars out with the jar grabber and place them in a cool dry place. You will eventually hear the jars pop. This means the jars have been properly sealed. If a jar top, when pressed in, pops up and down it has not been processed properly. The best thing to do is immediately refrigerate and enjoy the fruit of your labor.
The final yield was 10 pints and 2 quarts. That is a nice yield for approximately 50 apples. Enjoy.
Friday, October 16, 2009
Chicken Kiev
Several years ago this was a very popular entree that could be found on the menus of some of New York’s finest restaurants. But, it would eventually give way to the more modern, healthy, ‘low this and that’ cuisine. Perhaps that is because of the high butter content, all of which oozes out onto the plate as you make that first cut with your knife. Just the sight of it can cause your cholesterol numbers to climb. But some things I refuse to give up. This is one of them.
Ingredients:
8 tablespoons (1 stick) unsalted butter, room temperature
1 tablespoon parsley, fresh
1 tablespoon chives, fresh
2 teaspoons lemon juice, fresh
2 teaspoon dried tarragon
½ teaspoon thyme leaves, dried
pinch cayenne pepper
1 teaspoon kosher salt, plus extra for seasoning chicken
¼ teaspoon freshly ground black pepper, plus extra for seasoning chicken
6 boneless, skinless chicken breast halves
2 large whole eggs, beaten with 1 teaspoon water
2 cups bread crumbs, fresh ground
1 cup flour, for dredging
Preparation:
Combine butter, parsley, chives, tarragon, thyme, 1 teaspoon salt, 1/4 teaspoon black pepper and cayenne in the bowl of a stand mixer. Place mixture on plastic wrap or waxed paper and roll into small log; place in freezer.
Place chicken breasts, 1 at a time, between 2 pieces of plastic wrap. Squirt chicken lightly with water and squirt the top of the plastic wrap as well. Pound to no less than 1/8-inch thickness. Season each piece of chicken with salt and pepper.
Lay 1 chicken breast on a new piece of plastic wrap and place 1 tablespoon of the compound butter and 1 tablespoon bread crumbs in the center of each breast. Using the plastic wrap to assist, fold in ends of breast and roll breast into a log, completely enclosing the butter; roll very tightly. Repeat with each breast. Place chicken in refrigerator for 2 hours, or up to overnight.
Place egg and water mixture in 1 pie pan, season with salt and pepper; and bread crumbs and flour in different pie pans.
Dip each breast first in the in the flour, then egg mixture and then roll in the bread crumbs. Place on a rack over a pan and refrigerate for about two hours.
Preheat oven to 350 degrees. Heat 1/2-inch of vegetable oil in a 12-inch saute pan over medium-high heat until oil reaches 325-350 degrees F.
Remove from fridge when ready to cook. Gently place each breast in oil, sealed-side down, and brown. Transfer to a baking pan and bake in preheated oven for 20 minutes. Remove to a cooling rack set in sheet pan and allow to drain for 5 to 10 minutes before serving. Six servings.
Saturday, October 3, 2009
Sweet Potato Pecan Pound Cake
I found these organic sweet potatoes to have a sweeter than usual taste, and not stringy, allowing the use of all of the potato. Baking, instead of boiling, brought out even more of the sweetness. Also, they were more tender, thereby requiring less baking time. Based on this experience, I believe I just became a regular customer!
Ingredients:
Cake:
2 cups sweet potatoes, baked, peeled & pureed
1 cup butter, unsalted
1 cup granulated sugar
1 cup light brown sugar, packed
4 large eggs
1 teaspoon vanilla paste, or extract
3 cups all-purpose flour
1 teaspoon baking powder
½ teaspoon baking soda
½ teaspoon salt, fine grind
2 teaspoons cardamom
⅓ cup buttermilk
1-½ cup pecans, coarsely chopped
Glaze:
⅓ cup butter, unsalted
¾ cup brown sugar
⅓ cup confectioner's sugar
1 teaspoon vanilla paste, or vanilla extract
3 tablespoons bourbon
½ cup white chocolate, melted
½ cup pecans, chopped & toasted
Preparation:
Cake:
Heat oven to 350 degrees. Bake sweet potatoes until soft - approximately 50 minutes to 1 hour, depending on size. When done, puree in food processor or mash by hand.
Spray a 12 cup bundt pan or angel food cake pan with non-stick cooking spray. Cream butter with sugars and beat in eggs, one at a time. Add vanilla paste and sweet potatoes and blend well. In another bowl, combine flour, baking powder, baking soda, salt and spice. Stir into the batter, alternating with the buttermilk, until blended. Fold in chopped pecans and spoon the batter into the cake pan. Bake for 1 hour and 15 minutes, or until a cake tester inserted in the center comes out clean. Cool in pan on a rack for 10 minutes. Carefully move the cake from the pan to the rack and let cool completely.
Glaze:
Heat the butter and brown sugar in a small saucepan and let cook, bubbling gently, about 5 - 8 minutes until slightly thickened. Remove from the stove and briskly stir in confectioner's sugar. Stir in the vanilla and bourbon. Drizzle over cake, then sprinkle with pecans. Let cool 30 - 60 minutes and then last, drizzle on the white chocolate
Monday, September 21, 2009
Homegrown, Fresh and Delivered
Located in Clark Hill, South Carolina, is Persimmon Hill Farm. Owner Kay Pittman has been producing ‘all-natural’ vegetables and fruits for 27 years on her 15 acres farm. She is part of the Community Supported Agriculture (CSA) movement. CSA’s, which exist throughout the USA, have become popular and are a way for consumers to purchase fresh, seasonal food directly from the farmer. The farmers offer “shares, memberships or subscriptions” to interested consumers which entitles them to receive a portion of seasonal produce each week throughout the farming season.
The advantages for the consumers are: ultra-fresh food with flavor and vitamin benefits, exposure to new vegetables and new ways of cooking, develop a relationship with the farmer who grows their food and learn more about how food is grown. The advantages for the farmers are: get to spend time marketing the food early in the year, receive payment early in the season which helps with the farms’ cash flow, an opportunity to get to know the people who eat the food they grow.
Persimmon Hill Farm offers half shares at $25/week, which provides a variety of vegetables for 2 people; $40/week for 4 people. The 'share' fee includes delivery to your home, of produce picked the same morning. It doesn’t get any fresher than that!
Kay delivers to Augusta, Martinez, Grovetown, Lincolnton, North Augusta and Aiken. To learn more about CSA’s or to buy a share in Persimmon Hill Farm, and start receiving your weekly delivery, contact:
Kay Pittman
706.825.0906
organicphf@hotmail.com
Thursday, September 3, 2009
Onion & Feta Tartlets
Ingredients
2 large red onions, finely chopped
2 teaspoons fresh thyme, chopped
Pie crust (recipe below)
½ cup feta cheese, crumbled
¼ red bell pepper, chopped (optional for garnish)
2 eggs
½ cup heavy cream
Salt and white pepper
Preparation
Make crust. Preheat oven to 350 degrees. Heat oil in a skillet (do not use a nonstick one or onions will not caramelize). Add onions and cook over medium low heat until caramelized, about 25 minutes, stirring occasionally. Stir in thyme and set aside to cool.
Grease 24-cup miniature muffin pan. Roll out crust into a three thin sheets. Using a 3” round cookie or biscuit cutter, cut out 24 rounds – 8 from each sheet of crust – and line the cups of the muffin pan.
Divide the onion mixture into the 24 cups, and then spoon in the feta. Add a piece of red bell pepper (optional). Combine the eggs with the cream, season and pour into the crust cases.
Bake for 20-25 minutes, or until puffed and light golden. Leave in the pan for 5 minutes before transferring to a wire rack to cool.
Crust
3 cups all purpose flour
1/3 teaspoon salt
1 cup cold butter, diced
6-7 Tablespoons cold water
Combine flour and salt in large bowl; cut in butter with pastry blender or fork until mixture resembles coarse crumbs. Stir in enough water with fork just until flour is moistened. Divide dough into thirds; shape each into a ball. Flatten slightly. Wrap in plastic food wrap; refrigerate until ready to use.
Sunday, August 16, 2009
Cantaloupe Pie with Ginger Snap Crust
Thank you Captain Sam for sharing this warm memory with me!
Cantaloupe Pie
Ingredients:
1 medium cantaloupe (the riper the better)
½ cup sugar
½ cup all-purpose flour
¼ teaspoon salt
3 egg yolks
2 tablespoons butter
¼ teaspoon vanilla bean paste
1-¼ cup crushed ginger snap cookies
½ stick butter, melted
2 tablespoons sugar
Whipped cream (optional)
Preparation:
Combine crushed cookies, butter and sugar. Press into a 9-inch pie plate, covering bottom and sides. Set aside.
Cut the cantaloupe in half, peel and remove seeds. Cut into small pieces and put into a medium saucepan. Cook over medium heat until it comes to a gentle boil. Put into a blender and puree. Return to pan.
Combine sugar, flour and salt and add to the cantaloupe mixture. Stir until thick.
In another bowl beat egg yolks. Add a little of the hot cantaloupe mixture to the egg yolks in order to heat yolks. Stir the yolks into the cantaloupe mixture. Continue to cook and stir the cantaloupe mixture until it is thick and creamy. Remove from heat. Add butter and vanilla paste. Pour into the pie shell.
Cool completely. Serve with whipped cream.
Thursday, July 30, 2009
New Orleans Barbeque Shrimp
I lived in New Orleans for 2 years. While there, I attempted to eat my way through the city. I was not able to dine in every great spot in the “Big Easy” but don’t feel sorry for me. I experienced the best and left with some good memories - not to mention all the recipes I could steal from willing and unwilling donors.
Many people have tried to copy Pascal’s Manale recipe; and it was even posted in the Times-Picayune newspaper several years ago - if in fact that was the authentic recipe. The recipe I have listed here is a culmination of no less than five different barbeque shrimp recipes that were given to me by friends who live there. It is not an exact match, but its close enough for me. If you ever find yourself in New Orleans, run, don’t walk to Pascal’s Manale. It will be one of the best experiences you’ll ever have. Trust me on this one.
New Orleans Barbeque Shrimp
Ingredients:
2 pounds shrimp
2 sticks butter, unsalted
4 cloves garlic, peeled and minced
1/4 cup olive oil
1 tablespoon worcestershire sauce
1/2 bottle beer (6 ounces) - preferably Abita Amber
Juice of one lemon
1 teaspoon cayenne pepper
1 tablespoon creole seasoning
1 tablespoon rosemary leaves, chopped
1 tablespoon parsley, chopped
1 teaspoon oregano, chopped
1 teaspoon paprika
1/2 teaspoon black pepper
Tabasco, to taste (optional)
French bread
Preparation:
Clean shrimp and lay into a shallow casserole dish in one layer.
Melt butter in a saucepan. Add all other ingredients, except bread, and stir until beer foam subsides. Cover with plastic wrap and refrigerate for 2 - 3 hours. Baste and turn shrimp every 30 minutes.
Preheat oven to 350 degrees and bake uncovered for about 20 minutes or until shrimp are pink and cooked.
Serve in a soup bowl with sauce and lots of french bread.
Thursday, July 23, 2009
A Chef With a Vision
So what brought Chef Randy to Aiken? Retired since he was 40 and living at the beach in New Jersey, he "got fed up with the depressing economic climate and negativity of living in the northeast." He moved to Aiken to be near his mother, who has lived in the area for 12 years. Once here, he was asked to revamp the culinary arts program at Aiken Technical College. But his retirement from the restaurant business was soon to end. “I need the action. After 8 years of living at the beach I was ready to get busy.” Prime Steakhouse was born again.
When asked why he would take on such a venture in this economy, he says it is because of the rapid growth of Aiken and the surrounding areas. “The south is the new northeast. My friends are moving to South Carolina, not Florida.” His vision for Prime Steakhouse is that it will “quickly become the finest restaurant in Aiken County.” Within two years he hopes to add more locations in Aiken and around the state.
Prime Steakhouse opened Friday, July 10th and features prime aged beef, and lobsters that are flown in daily. Beginning next week, a Raw Bar with oysters, shrimp and clams will be available in the bar area every afternoon starting at 3 p.m. But don’t be fooled by the name. Prime Steakhouse offers more than just steak. They are open daily for lunch (except Sunday) and have a full lunch menu with soups, sandwiches and salads (see Ahi Tuna Salad recipe below).
http://www.primesteakhouseaiken.com/
321 Richland Avenue
Aiken, South Carolina
803.642.4488
Peppercorn Ahi Tuna Salad with Wasabi and Balsamic Sauces (Recipe by Chef Randy Stamm)
Ingredients:
Ahi tuna loin
ground black peppercorn
mixed salad greens
wasabi (tube)
white wine vinegar
corn oil
red balsamic vinegar
Preparation:
Dust tuna loin with black pepper. Sear on all sides just until rare. Set aside.
Squeeze wasabi into a bowl and add vinegar and oil to make a runny sauce. Place in a squirt bottle and refrigerate to thicken.
In a medium sauce pan slowly reduce red balsamic vinegar by half and cool to room temperature. (If not reduced slowly, it will taste burnt.)
Slice tuna and arrange over greens. Serve with sauces.
Thursday, July 16, 2009
Old-Fashioned Tea Cakes
Everyone has childhood memories of something that was just so delicious they couldn’t forget it. For me it was tea cakes. My aunt Lillie B., who lived in Memphis, would always bring them to us when she came to visit. Needless to say, we always looked forward to her visits with great anticipation. One of my biggest regrets is that I did not get her recipe before she passed away.
Recently a friend gave me a cookbook, Sweets by Patty Pinner. Much to my surprise and delight, Ms. Pinner shares her families’ tea cake recipes. I made the Old Fashioned Tea Cakes. They were scrumptious! Not too sweet and the nutmeg added just the right amount of spice. If you are a tea drinker, these tea cakes are the perfect accompaniment for your afternoon cup of Earl Grey.
Old-Fashioned Tea Cakes
(Recipe by Patty Pinner)
Ingredients
I cup unsalted butter (2 sticks)
1 ½ cups sugar
3 eggs
3 ½ - 5 cups all-purpose flour
2 teaspoons baking powder
1 teaspoon ground nutmeg
½ cup buttermilk
½ cup light molasses
1 teaspoon vanilla extract
Preparation
Preheat oven to 350 degrees. Lightly grease 2 cookie sheets. Set aside.
In a large mixing bowl, cream together the butter and sugar. Stir in the eggs one at a time, beating well after each addition, then set the bowl aside. In another bowl, sift together the flour, baking powder and nutmeg. Set the bowl aside/ Pour the buttermilk into another bowl. Pour the molasses into the buttermilk. Add the vanilla extract and mix well. Add the flour mixture, a cup at a time, to the butter mixture, alternating with the buttermilk mixture. Add more flour if needed, half a cup at a time, until a smooth dough forms. Roll the dough out on a generously floured surface and then gather together to form a ball. Roll the dough out again, repeating this process 3 to 4 times. Roll out the dough ½ inch thick, then cut with a drinking glass or a round cookie cutter. *
Bake the tea cakes on the greased cookie sheets for 8 to 10 minutes, or until slightly brown. Remove the tea cakes from the oven and allow to cool on the cookie sheet for 5 minutes before transferring them to a wire rack to cool completely. Makes 2 to 3 dozen.
* I used various cookie cutter shapes.
Friday, June 26, 2009
Canned Peaches - A Labor of Love
I remember when I was a young girl growing up in Chicago; every summer my mother, aunts and I would drive up to the countryside of Michigan to pick peaches for canning. We would return with the trunk loaded with bushels of peaches - not to mention the 'almost bushel' that we ate during the drive back home. My mother would spend the better part of a week washing countless jars and lids. And we would both spend what seemed like days peeling, pitting, slicing and finally cooking the bushels of peaches. I can't say that I miss those days - after all that was hard work. But what I do miss is all the pies, cobblers and other goodies that my Mother made for us, all year long, as the result of a few weeks of a labor of love!
Recently a good friend of mine from culinary school, Sharon Beamon, told me about her attempt at canning peaches, and how surprisingly easy it was. Below she shares her process with us.
Canned Peaches
"Canning seems to have become an extinct practice. My mother taught it to me and her mother taught her and so on. I decided to rekindle my desire to can peaches this year. It is somewhat of a time consuming process; but if you have all the necessary tools in place, it reduces the canning time considerably." (Sharon Beamon)
Ingredients:
32 Peaches (makes 5-6 quarts)
3 cups sugar
6 cups water
¼ cup lemon juice or
Fruit Fresh
Equipment:
Jar Grabber
Water Canner
Lid lifter (I use tongs)
Jar funnel
2 large pots
1 small pot (to boil lids and rings)
Ball jars
Jar lids and rings
Slotted spoon
Table knife
Large glass bowl (Used for ice water bath)
Preparation:
Prepare the sugar syrup in one of the large pots. Stir the sugar and water together and bring the solution to a boil. Once the solution comes to a boil and the sugar has dissolved reduce the heat so the syrup can simmer.
Place lids and rings in small pot of boiling water. Reduce heat after a few minutes. Wash jars in hot soapy water and rinse. Place jars in a large pot of hot water and bring to a boil, reducing heat once water boils. (This step is not necessary but this is the way I was taught. This ensures that the jars are clean with no soapy residue remaining.)
Wash fruit thoroughly. Fill another other large pot with ¾ of water and bring to a boil. Cut a small "X" on the bottom of peaches. Carefully drop into hot water, 6 peaches at a time, for 45 seconds to 1 minute max. Scoop them out of the boiling water with a slotted spoon and place in an ice water bath. This will stop the cooking and make it easy to peel the skin off the peaches. Remove any brown spots or overly ripe areas, and then slice the peaches off the pit.
Once you have sliced the 6 peaches, add a ¼ cup of lemon juice or sprinkle with Fruit Fresh. Stir the peaches to ensure they are fully coated. This will reduce the browning of fruit and keep it a bright vibrant peach color. Repeat these steps until all peaches have been processed. Place all the peaches in the syrup on the stove for 5 minutes.
While the peaches are in the syrup solution, remove jars from hot water bath and place on a clean dry towel.
Turn the syrup solution off. Fill the jars with peaches - leaving a ½ inch head space - using your jar funnel and slotted spoon. Try to pack the peaches in the jars tightly without crushing them. When all the jars are filled with peaches, add in the syrup to each jar ensuring that the peaches are completely cover with syrup. Run a table knife between the jar and fruit tilting the jar slightly to release air bubbles that are trapped inside. Wipe the rim of the jar and carefully place the lid on top of each jar then screw on the jar ring but not too tight.
Place all jars in canner with at least 1 inch of boiling water and cover for at least 20 minutes but no more than 30 minutes. With your jar grabber lift each jar out, place on a clean dry towel, and leave over night. Check to make sure the lids are sealed by pressing in the middle of the lid. If the lid did not seal properly, it will move up and down. These unsealed jars can be stored in the refrigerator and you will still be able to eat the fruit. (Any unsealed jars of fruit cannot be stored outside of the refrigerator.) Store sealed jars in a cool dry place.
*For more detailed instruction go to: www.pickyourown.org/peachcanning.htm
Wednesday, June 17, 2009
Peach Amaretto Ice Cream
Yet another one of my favorite peach recipes. If you like ice cream this just might become your favorite as well. I remember the first time I had peach ice cream – it was at the first Ridge Peach Festival I attended shortly after moving to South Carolina. I couldn’t get enough of it! Hopefully after trying it, you will be hooked too. And if you happen to be in the area this weekend, do stop by and experience the Ridge Peach Festival for yourself. I promise you will have lots of fun and good "peach" eats.
Ingredients:
4 large ripe peaches, peeled, pitted and chopped
1 ½ tablespoons fresh lemon juice
2 tablespoons sugar
2 tablespoons Amaretto
1 ½ cups heavy cream
1 ½ cups whole milk
1 vanilla bean, split
6 egg yolks
½ cup sugar
Preparation:
Mash half the peaches in a bowl. Sprinkle with lemon juice, sugar and Amaretto and combine. Cover and refrigerate.
In a heavy 2 quart saucepan, combine the milk and 1 cup of the cream and the remaining peaches. Scrape the seeds from the vanilla bean and add to the milk mixture along with the vanilla bean. Cook over medium heat until bubbles form around the edges of the pan, approximately 5 minutes. Remove from heat. Strain through a fine mesh sieve, pressing on the peaches with the back of a spoon. Discard the solids and the vanilla bean.
Combine egg yolks, sugar and remaining cream in a bowl. Whisk until smooth. Gradually whisk in ½ cup of hot milk mixture into egg mixture, whisking constantly until smooth. Pour back into saucepan.
Cook over medium heat, stirring constantly and keeping at a simmer until it is thick enough to coat the back of the spoon – about 4 to 6 minutes. Do not let the custard boil.
Strain through a sieve into a bowl. Place the bowl in a larger bowl filled with ice and water. Stir occasionally to cool. Cover with plastic wrap, pressing it directly on the surface of the custard to prevent a skim from forming. Refrigerate until chilled, at least 3 hours.
Put the custard into an ice cream maker and freeze according to manufacturers instructions. Add the Amaretto and smashed peaches after the custard is nearly frozen - about five minutes before removing from the machine. Transfer to a freezer-safe container. Cover and freeze until firm - at least 3 hours.